
As you may know, we spent last week exploring an Easy Access Guide to testing overall, as well as common meth testing mistakes that can cost. This week, we’re offering another guide on how to properly test a home for meth.
Of course, we need to insert a small disclaimer here. No matter how thorough or thought-out a blog like this may be, (behold the shameless self-flattery), it’s no substitute for professional training. Feel free to visit last week’s post for more information about that (and why we recommend calling a professional before you attempt this process on your own.)
That being said, we want you to have the tools to recognize improper testing when it happens. So without further ado, let’s jump in and take a look at how to execute a home methamphetamine test correctly.
What Are the Steps for Proper Meth Testing?
- First thing’s first, be sure to buy the right kind of test.
- Next, you’ll want to wear a pair of rubber gloves. This will keep you from getting hazardous material on your skin and avoid contaminating the test. (On that note, be sure to change your gloves with each sample. Do not touch fresh gauze without wearing a new pair of gloves.)
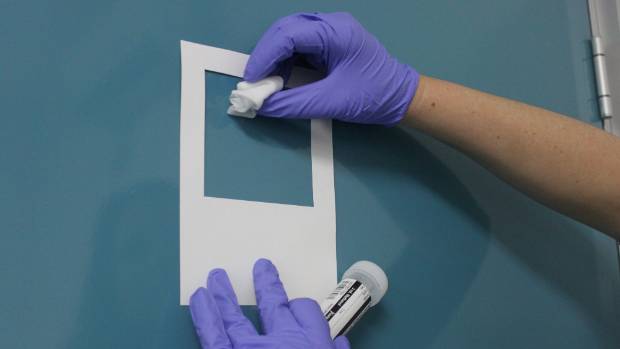
- Fix your testing template (100 cm²) to the testing area. Be sure to follow all guidelines for labeling, photographing, and locating testing areas as discussed in the Utah Administrative Code – R392-600. (This code also includes information on state requirements for gauze, sampling techniques, and acceptable types of tests. Be sure to thoroughly read and understand that document before moving forward.)
- Now locate your testing tube. (Be sure not to contaminate the tube throughout this process – except, of course, with the applicable sample.) Do not touch the inside of the tube or set it down with the open end on any surfaces. (Your kit may also contain sterile gauze and a wetting agent. If not, you will have to buy these separately.)
- Depending on the type of test, you will either swab one or multiple areas. Similarly, you may need to transport the swabs together or in individual tubes. Be sure to follow the instructions on your kit.
- Fold your gauze into fourths, and apply the wetting agent.
- Swab the area inside the testing area template from left to right, and again up and down. Repeat this at least five times using perpendicular motions.
- Place your swab into the tube immediately to avoid cross-contamination, and refrigerate your sample until you send it to the lab.
- If the swab comes into contact with another surface (for instance – if it is dropped), it is no longer a viable sample.
- Be aware that there is a lot of room for error here. So be thorough and follow all the guidelines discussed in the Administrative Code, even if it means buying several kits. *Please note we buy our tests in bulk – which means hiring the right professional can actually save you money.
- Test cold returns, above beds, furnaces, near fans, outside of vents, or inside kitchen range hoods. Think like a meth addict, and be aware of how meth interacts with various materials.
- In most circumstances, it is wise to test each room in the house – which will usually include multiple samples per room.
Call Us With Questions
While this may seem like a simple process on face value, there are some subtleties and plenty of room for error. Without proper training, it’s easy to make mistakes or miss a step. And, unfortunately, just one mistake can compromise an entire test. Be sure to take caution and again – follow the instructions on your kit and the Administrative Code, and don’t cut corners.
Finally, don’t be afraid to call and ask for help. It’s normal to have questions and to be unsure if you’re proceeding correctly. For help with testing and decontamination, call a Certified Decontamination Specialist in your area. Or, if you’re in Utah, AEI Decon is always happy to help. You can reach us at (801) 888-6698.
![]()
![]()
![]()
![]()
![]()
![]()
![]()
![]()